Deadlift day is my favorite day of the week.
After reading This Ultimate Guide to Deadlifts – it’ll be yours too!
- What are the benefits of the deadlift?
- What is proper deadlift form? How to deadlift safely (with videos)
- Setting the bar down (Should I drop the bar on a deadlift?)
- Proper deadlift grip, straps, and other equipment.
- 7 common mistakes when deadlifting.
- What are the different types of deadlifts?
- Frequently Asked Questions on the deadlift (including starting weight).
Teaching people how to deadlift and get comfortable with barbell training is one of my favorite things about 1-on-1 online coaching program Toronto personal Trainer.
We do video form checks via our coaching app, we’ll build a program that fits your schedule, and even help you get your nutrition dialed in too.
If that sounds like something you’d be interested in…
What Are the Benefits of the Deadlift?
The deadlift is a comprehensive full-body exercise.
While some might categorize it as a “back” workout, others argue it’s primarily for the “legs.”
In my opinion, it engages every muscle group.
I’ve put together this guide on Deadlifts because it’s an exercise that can revolutionize your life too.
So, what makes the deadlift so remarkable?
When you perform a deadlift, every muscle in your body comes into play:
- Your arms, forearms, and hands grip the barbell, ensuring it remains in the correct position and stable throughout the lift.
- Your shoulders and traps bear the weight and stabilize it.
- Your back and core work to keep your entire body tight and steady, ensuring the safety of your spine.
- Your posterior chain and legs act as a lever to lift the weight.
- When people inquire about the secret to my well-developed shoulders or abs, my response is consistent: deadlifts.
- Why spend time on endless crunches when I can achieve more with deadlifts?
It’s way more enjoyable! Moreover, deadlifting is more effective at building a robust core.

Additionally, the deadlift mirrors a fundamental human movement. Aside from squats, there might not be another movement more “functional.”
From grocery shopping to moving furniture or picking up your child from the floor – you’re essentially deadlifting.
As you master proper deadlift form in the gym, your technique for lifting things in daily life will also improve.
This means you’re less likely to injure yourself, not only because you’re stronger but because your body knows how to handle the weight properly.
And this extends beyond merely picking up objects – your movements while shoveling snow, doing yard work, and performing various everyday tasks will significantly enhance through deadlifting.
Don’t become someone who suffers from back problems due to lifting random objects!
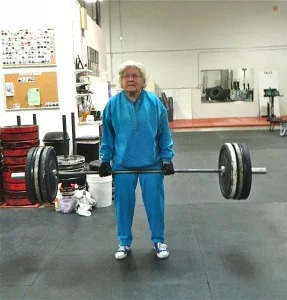
Oh, and by the way, the benefits of deadlifts aren’t confined to a particular age or gender – even grandma thinks they’re fantastic.
The deadlift is incredible – perhaps the purest gauge of strength: either you can lift the weight off the ground, or you can’t.
What Is Proper Deadlift Form? How to Deadlift Safely
When doing a deadlift you’ll be lifting a dead weight off the ground (hence the name, duh).
The deadlift can actually be taught in one sentence:
“Bend your knees and bend over with a flat back to pick up a loaded barbell off the ground.”
Of course, this sentence doesn’t do the awesomeness of this exercise justice.
Here’s how to do a conventional barbell deadlift:
- Step up to and under a barbell with your feet angled slightly outward, at hip-width apart.
- Bend over and grip the barbell with both hands at shoulder width.
- Bend your knees until the bar almost touches your shins.
- With a neutral spine, flex your butt and brace your stomach.
- Pick the bar up off the ground (It helps to think “press DOWN into the floor with your feet through your heels”).
- Continue pressing down with your legs until the barbell passes your knees, then thrust your hips forward until you are standing up.
- Reverse your movement until the bar returns to its starting place on the ground.
- High five yourself for you doing a deadlift.
(Don’t worry I’ll get more in-depth below.)
Oh, what’s that?
You want even MORE detail on each of those steps!? Sure.
PHASE ONE: The Deadlift Setup.
*NOTE: Always warm up properly, and start with just the bar, even for deadlifts!
1) Load the bar and secure the plates with collars. If you are just starting out with the movement, begin with 5-10 lb plates, using boxes or blocks to elevate the bar to about where it would be with 45 lb plates attached (if your gym has training plates that are this size, even better!). You may also be able to use your gym’s power rack for this.
2) Step up to the bar as if you are about to JUMP. Naturally, your feet should end up about hip width (8-12 inches) apart, and your feet slightly angled outwards (5-10 degrees).
3) Look down – the bar should be over the middle of your feet. If you’re wearing laced shoes, the bar would be approximately over the tied part of your shoelaces.
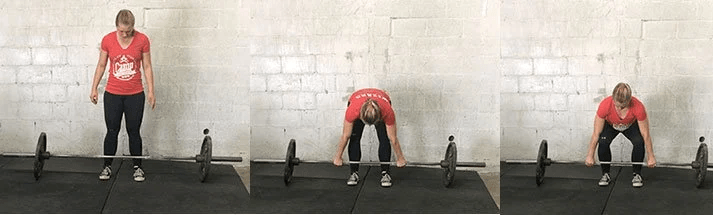
PHASE TWO: Preparing to lift the bar!
Here are the next steps to take before lifting the bar off the ground (I’ll petition Websters to add the word “deadliftoff” to the dictionary):
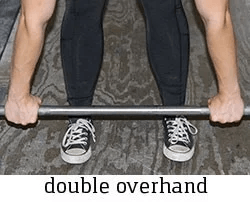
- Without moving the bar, or your hips, bend over and grab the bar. Your legs should still be straight at this point. Your grip width will be slightly outside of your legs, but not so close they touch. For now, a simple double overhand grip (both palms facing behind you) will work. We will discuss options in grip in more detail later!
- Now that you’re holding onto the bar (but not moving it), move your hips down. While you do this, your shins will come forward until they touch the bar Stop moving your hips down when your shins touch the bar.
- Press your chest out and flex your pecs like you’re King Kong getting ready to bang on your chest for intimidation. As you do this, your back should flatten, and your spine should go into a neutral spine position.
This is the final starting position of the deadlift: everything is tight and in position and you’re ready to pull.
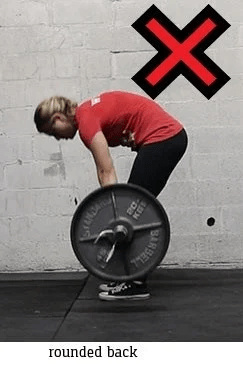
To Recap we DON’T want your back to round or hyperextend.
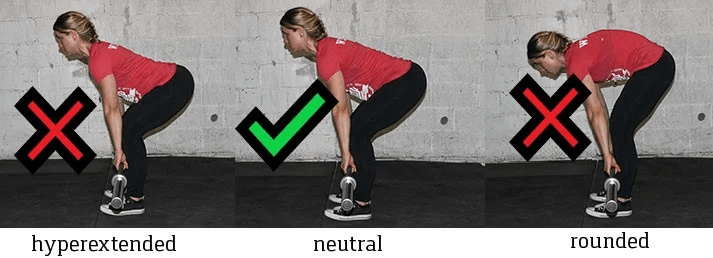
If you’re just starting out, getting into a neutral spine might feel like you’ve gone too far (hyperextended), so don’t be afraid to ask a friend for help or to record yourself so you can see what you’re doing.
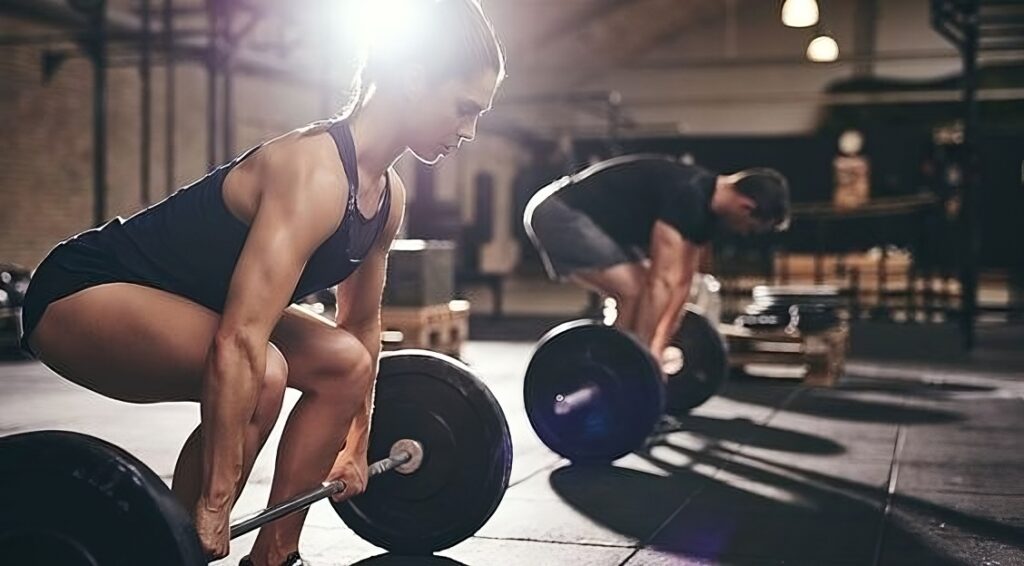
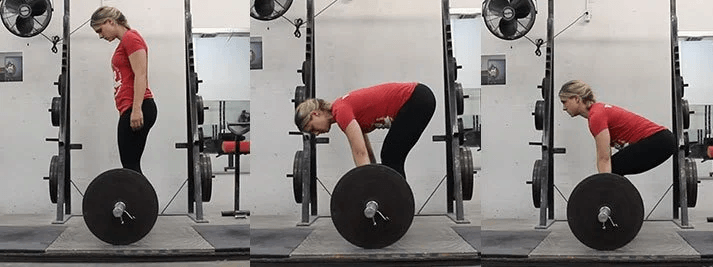
PHASE THREE: Deadlifting with proper form (THE DEADLIFTOFF!)
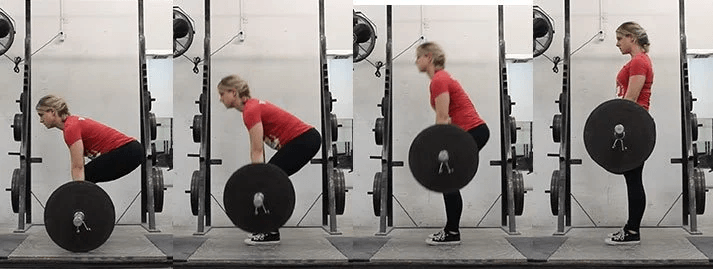
If your setup looks and feels good, you’re ready to lift.
Here are those steps in written form.
Inhale and fill up space deep in your stomach (like a deep belly breath), and while keeping your entire back, butt, and core tight with your chest puffed out, drive down through your heels and the bar should lift off the ground:
- All of your weight should be on your heels and midfoot. You should be able to wiggle your toes the entire time (though that is not a part of deadlifting!). Imagine you are pushing the earth world away from the bar with your heels rather than pulling the bar up.
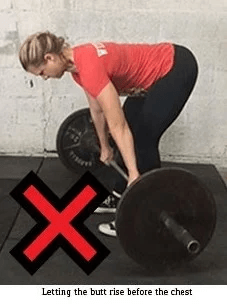
- During the movement, your entire body should move upwards at the same speed. This means that your butt should not rise faster than your chest, or vice versa. You may have heard of the term “stripper deadlift” – this is when your butt rises first before your chest.
- Your arms should stay straight the entire time. They are just there to hold onto the bar – they are not bending or pulling at all. Your legs and core are doing all the work!
- The bar should stay in contact with your body the entire time – you will literally be dragging it up your thighs. This is why you see many powerlifters with chalk or baby powder covering their legs (and why they typically wear socks that cover their shins, to prevent cuts and scrapes). Do not let it come forward. If you were to draw a line that follows the bar’s path from the floor to lockout, it should be a straight, vertical line.
- As you are pulling, you should be squeezing your glutes like you’re pinching a penny between your…well, you know. Once the bar passes your knees, think of getting your hips under the bar by squeezing your glutes. So while you’re pulling with your arms, you’re pushing through the floor with your feet, pushing your butt under the bar.
- At the top of the movement, you should be standing tall and proud with your chest open, like if you were King Kong getting ready to pound his chest.
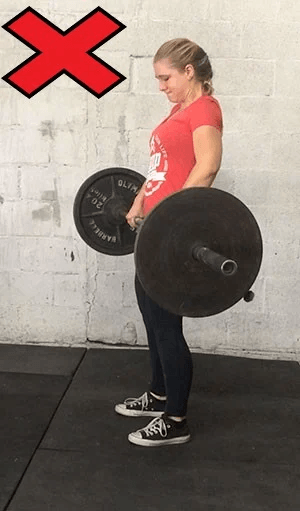
- At the top, do not hyperextend and lean back. You want to keep your spine neutral and everything tight.
I realize that’s a lot to take in, and that’s okay! You’ve read this far and I’m proud of you.
Many people are so afraid of the deadlift and avoid it at all costs because they’re afraid of splitting themselves in half or getting injured in another way.
That’s why we not only created this awesome guide on deadlifts, but also a way to review technique and proper movement so you have the confidence you’re doing it correctly.
Setting the Bar Down (Should I drop the bar on a Deadlift?)
Alright! You’ve successfully lifted the weight off the ground and completed the deadlift movement. What’s next?
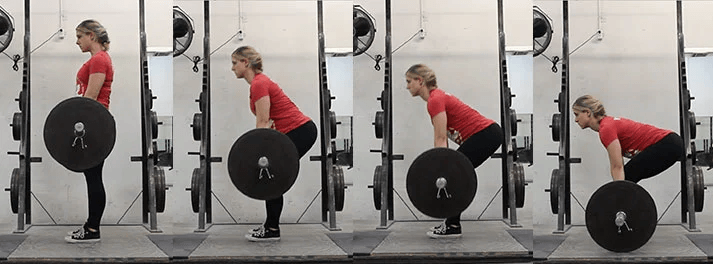
The descent of your body should be a reversal of the ascent, with all parts moving simultaneously!
Start by unlocking your hips and slowly shifting them backward until the bar descends past your knees. Then, bend your knees gradually, lowering the bar gently to place it back down (ensure you unlock them simultaneously).
Here’s a crucial reminder: DO NOT do this:
DO NOT unlock your knees first when lowering the deadlift!
Maintain tightness until you have released the bar.
This is immensely important – a significant number of deadlift injuries occur when individuals get overly excited about a successful lift, lose tightness, and mishandle the bar during descent.
You should aim for a swift movement – lowering the deadlift slowly can be exhausting and leave you sore for days.
Should you drop the bar after completing the deadlift?
Interestingly, the lowering (eccentric) phase of the deadlift is riskier than the lifting (concentric) phase.
Many coaches suggest dropping the bar after completing the deadlift, especially for advanced athletes who cannot afford to compromise their performance later in the week.
In our view, particularly if you’re training in a commercial gym, we recommend placing the bar down gently (especially if you intend to compete in powerlifting events – the lift won’t be counted if you drop the bar).
Hence, it’s crucial to practice lowering the bar properly. It’s as vital as mastering the lifting phase.
Proper Deadlift Grip, Straps, and other Equipment
Grip strength is a huge part of the deadlift. If you can’t hold on to the bar, you can’t lift it!
Here’s how to improve your grip strength quickly.
There are two main grips when it comes to the deadlift.
1) Double overhand grip. Your palms are both facing towards your body. This is the safest grip, and the best grip for beginners to start with.
2) Mixed Grip: One hand grabs the bar with an overhand grip, and another hand grabs the bar with an underhand grip.
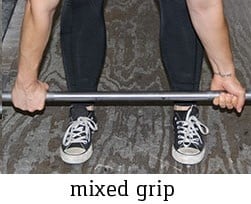
The mixed grip has many disadvantages:
- It places uneven stress on your shoulders
- It can aggravate problems in the biceps on the side in which your palm is facing outwards
- It’s easier for your lift to be uneven as you’re literally gripping the bar it with uneven hands.
So why do a mixed grip?
You can physically lift more. The bar wants to roll out of your hands, so by using a mixed grip you are more likely to not have your grip fail you on a heavy lift.
As you start to lift more than your grip can handle, you can consider doing a mixed grip for your heaviest lifts, but be sure to use the double-overhand throughout your warm-up sets. Consider doing grip strength work as well.
3) Hook grip: This grip is where you put your thumbs under your fingers.
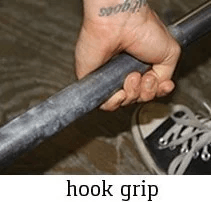
This type of grip is preferable to the mixed grip due to the fact that it doesn’t introduce any imbalances. However, it does have one major disadvantage:
It hurts like hell!
From personal experience, you get used to it and your thumbs can manage, but prepare for pain when you learn to do the hook grip!
No matter what grip you use, you’re probably going to want to invest in some chalk! It’s absolutely optional and initially won’t be incredibly useful.
However, after you start to put some weight on the bar, chalk will be enormously helpful for hanging on to the bar (I use this kind of lifting chalk). I certainly find this to be a better, smarter, and safer option than either straps or gloves.
Speaking of which…
Here are some common questions on deadlift equipment:
1) “Should I use straps while doing deadlifts?”
Ehhh, probably not. Straps can help you lift more than your hands can hold with an overhand grip, but relying on straps could cause your grip strength to be undeveloped down the road.
You’re better off developing your grip strength alongside your deadlifts.
Short answer: consider using straps strategically when doing high-volume deadlifts, but don’t rely on regularly them for max lifts: improve your grip strength.
Instead, chalk, stronger grip strength, and a hook grip for max lifts is your friend!
2) “Should I wear gloves while doing a deadlift?”
Nope.
Gloves actually create space between your hands and the bar, and it reduces your grip security, increases the diameter of the bar, and makes the bar harder to hold on to.
This means the gloves are doing the exact OPPOSITE of what you think they’re doing.
Use chalk instead, my friend.
I don’t recommend using gloves unless you have an injury like a ripped callus.
Speaking of ripped calluses, or if you’re worried about getting rough hands from deadlifting – make sure to take care of your hands and they are less likely to happen!
3) “Do I need to use a lifting belt?”
When starting out, you don’t have to worry about using a belt.
However, as you get to really heavy weights, it may be something to look into.
Belts need to be worn correctly in order to be effective.
4) “What kind of shoes should I wear to deadlift?”
GREAT question. I don’t care what kind of shoes they are, as long as they are flat.
You really have four options for deadlifting shoes:
- FLAT SHOES: Chucks work great. I personally prefer to deadlift in either socks or zero drop minimalist shoes. Do NOT wear clunky athletic shoes with thick heels or shoes with pockets of air bubbles in the heels.
- DEADLIFTING SHOES: Getting a bit fancy here, but if you are competing or just want shoes you can deadlift in, consider deadlifting shoes.
- GO BAREFOOT: If you don’t want to invest in new shoes, deadlift barefoot. Just don’t go walking around the gym in socks – you might get kicked out or have a weight roll across your feet!
- SLIPPERS: No, not fuzzy Snoopy ones. Look into deadlift slippers – they’re just fancy socks approved for competition.
Still here, eh? Amazing!
We want to be part of a community that helps you reach your goals. Whether you want to deadlift for the first time, or you’re trying to hit the 1,000 club, our Coaches want to help.
Let us take care of everything so all you have to worry about is following the instructions and picking up the weight!
7 Common Faults and Mistakes while Deadlifting
AVOID THESE ACTIONS:
1) Rounded Back – Maintaining a neutral spine throughout the deadlift is crucial. Allowing any rounding of the lower back is a significant mistake.
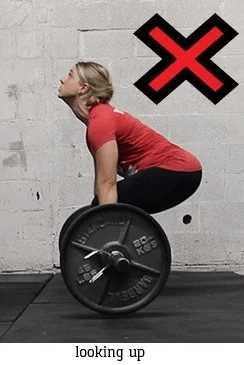
2) Looking up (with your neck) – In addition to preserving a neutral spine, avoid excessively arching your neck to look upward.
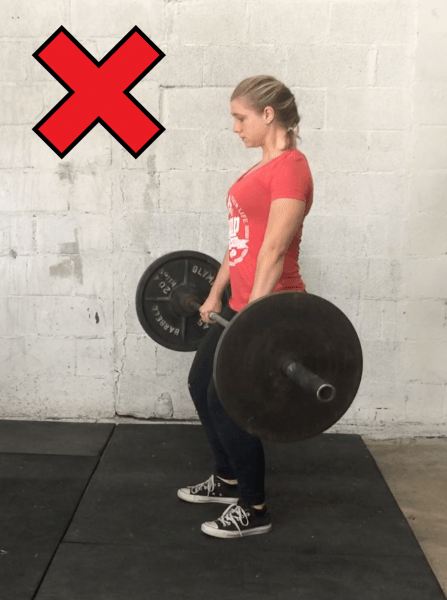
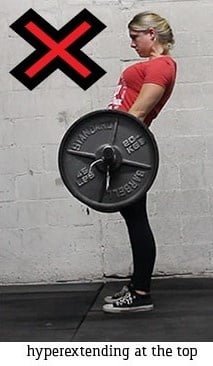
3) Hyperextending at the end of the movement – Even at the top of the movement, your spine should remain neutral. Overarching is unnecessary and not recommended.
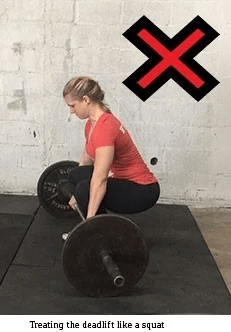
4) Treating the deadlift like a squat – Remember, the deadlift and squat are distinct movements. Don’t start in a squat position and stand up; it’s a different exercise.
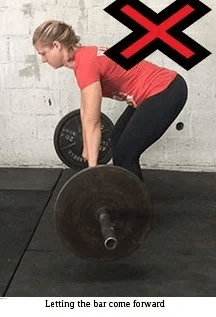
5) Letting the bar come forward – The bar should follow a straight path along your midline throughout the lift. Avoid any deviation forward from your midline.
6) Butt rises faster than your chest (aka “stripper deadlift”) – Maintain a synchronized upward movement, where your chest takes the lead, and your body rises evenly.
7) Bending your arms – Keep your arms straight. Refrain from bending your elbows in an attempt to lift the bar more quickly.
UNCERTAIN ABOUT YOUR FORM? I understand your concern. Personally, I incorrectly executed the deadlift for years without realizing it. It was only after seeking guidance from an online coach who assessed my form through video and provided appropriate “mental cues” that I began deadlifting correctly.
What Are the Different Types of Deadlifts?
So far we’ve addressed the conventional/traditional barbell deadlift.
There are MANY different variations of deadlifts, and you can use whichever one floats your boat (if you have a boat to float, that is).
Here are 8 different deadlift variations:
- 1) Conventional Deadlift – Your hands are just outside your feet, standing at about hip-width apart. Our article has been highlighting this form of deadlift.
- 2) Sumo Deadlift – Your hands are inside your feet with a wider stance.
- 3) Hex or Trap Bar Bar Deadlifts – Use a specialty bar made just for deadlifting which changes the biomechanics.
- 4) Snatch Grip Deadlift – Your hands will use a wide grip like in the Snatch.
- 5) Romanian Deadlift: Think of this as the top half of a conventional deadlift (imagine you’re a “drinking bird” bending over at the waist).
- 6) Deficit Deadlift: This movement increases the range of motion of your deadlift, since your feet are elevated compared to the bar.
- 7) Rack Pulls: Conversely, this decreases your range of motion with the deadlift, since the bar is raised higher.
- 8) Dumbbell Deadlift Variations: For either accessory work, or if you don’t have access to a barbell and weights.
This guide covered primarily the conventional deadlift, because it’s a great variation for beginners and an exercise you can do every week for the rest of your life.
Once you get comfy with it though, move onto others. Need more tips for strength training moves?
Frequently Asked Questions on the Deadlift
RECOMMENDATIONS REGARDING DEADLIFTING:
1) “What if I struggle with the initial position due to mobility issues?”
If mobility limitations hinder achieving the correct starting position, consider placing the bar on blocks, raising it a few inches to facilitate the right posture. Gradually lower the bar’s starting point with each workout until it’s at ground level.
2) “How do I determine the appropriate starting weight for deadlifting?”
Always commence with the bar only. Progress as outlined in our Strength Training 101 article titled “How Much Weight Should I Be Lifting?” Aim to lift slightly more each week, promoting gradual muscle, joint, tendon, grip, and central nervous system development.
3) “Should I perform ‘touch and go’ or ‘dead stop’ for multiple-rep sets?”
“Touch and go” involves rebounding the weight at the bottom of the movement, immediately transitioning to the next rep, making it comparatively easier due to the stretch reflex, locomotion, and bounce. However, it’s riskier as it can compromise form and cause fatigue. Opting for a “dead stop” between reps is safer, allowing for form and breathing adjustments with each repetition.
4) “How frequently should I incorporate deadlifts into my routine?”
While deadlifts offer immense benefits, it’s crucial to consider their taxing nature on the central nervous system. Given this, they necessitate sufficient recovery time. Typically, in well-designed strength programs, deadlifts are performed once a week, often with lighter volume compared to squats. The frequency and volume may vary based on an individual’s fitness level and goals, considering the need for adequate recovery.
Feel free to ask if you have any further questions or need assistance in devising a program to enhance your deadlifting prowess!